写在最前
本文描述了如何实现该需求的思路,代码可能不通用,但是该思路应该可以解决很多类似的需求…
需要分享的内容
- 上半部分,1-4张图片
- 下半部分,包含很多细小的东西,签名、用户名、用户头像、二维码图片…
- …
实现原理
因为我的需要还是比较复杂的(主要来自于上半部分的排列规则),所以直接 extends 了 ViewGroup 来 layout 这些子 View,然后用数据填充这些布局,然后创建分享 Bitmap。
对 ViewGroup 里的元素做一个抽象
对自定义View(我们就叫它 DynamicShareView 好了),它关心的是如何拿到上半部分的 View 和下半部分的 View,所以这里定义一个 Adapter 接口:
1
2
3
4
5
6
7
8
9
10
11
12
13
14
15
16
17
| public interface Adapter {
int getCoverCount();
View getImage(ViewGroup viewGroup, int position);
View getBottom(ViewGroup viewGroup);
}
|
对调用者来说,我们只需要调用 DynamicShareView 实例的 setAdapter 方法,然后将一个实现了 Adapter 接口的对象传给它,接着 DynamicShareView 会将这些 View 挨个添加到进来,如下:
1
2
3
4
5
6
7
8
9
10
11
12
13
14
15
16
17
18
19
20
| public void setAdapter(@NonNull Adapter adapter) {
mAdapter = adapter;
removeAllViews();
int imageCount = Math.min(mAdapter.getCoverCount(), MAX_COUNT);
for (int index = 0; index < imageCount; index++) {
View image = mAdapter.getImage(this, index);
addView(image);
mImages.add(image);
}
View bottomLayout = mAdapter.getBottom(this);
mBottomLayout = bottomLayout;
addView(bottomLayout, new LayoutParams(LayoutParams.MATCH_PARENT, LayoutParams.WRAP_CONTENT));
}
|
这步完成之后,才是重头戏,我们需要自己来 measure 内部的子 View,计算出 DynamicShareView 的宽高。
测量高度&布局
这里的实现,emmmmmmmmm,复杂度和产品的需求成正比。栗如,我这里的复杂度主要来自上半部分的排列规则:
1.一张封面时,封面的宽高等于屏幕的宽度
2.两张封面时,封面的宽度等于屏幕的宽度,高度为屏幕宽度的一半,上下排列
3.三张封面时,封面的高度等于屏幕宽度的一半,前两张图片占一行,均分;第三张图片独占一行
4.// 省略…
怎么破,这里,我定义了一个 Rule 接口:
1
2
3
4
5
6
| public interface Rule {
void measureChildren(int screenWidth, int screenHeight, int spacing, View... children);
void layoutChildren(int screenWidth, int screenHeight, int spacing, View... children);
}
|
然后定义5个子类来测量和布局,如下图:
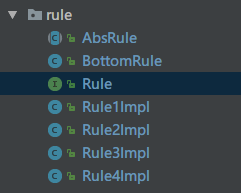
Rule1Impl 对应只有 1 个封面的情况,Rule2Impl 对应有 2 个封面的情况,以此类推。BottomRule 负责下半部分子 View 的测量和布局。当然,如果你喜欢,也可以写成一坨代码来 work。我们先来看下,onMeasure 方法长咋样吧。
onMeasure 步骤
1
2
3
4
5
6
7
8
9
10
11
12
13
14
15
16
17
18
19
20
21
22
23
24
25
26
27
28
29
30
31
32
33
34
35
36
37
38
39
40
41
42
| @Override protected void onMeasure(int widthMeasureSpec, int heightMeasureSpec) {
super.onMeasure(widthMeasureSpec, heightMeasureSpec);
int widthSize = MeasureSpec.getSize(widthMeasureSpec);
int heightSize = MeasureSpec.getSize(heightMeasureSpec);
int heightMode = MeasureSpec.getMode(heightMeasureSpec);
mActualWidth = widthSize;
switch (mImages.size()) {
case 1:
mRule1.measureChildren(mActualWidth, mActualHeight, mSpacing, mImages.get(0));
break;
case 2:
mRule2.measureChildren(mActualWidth, mActualHeight, mSpacing, mImages.get(0),
mImages.get(1));
break;
case 3:
mRule3.measureChildren(mActualWidth, mActualHeight, mSpacing, mImages.get(0),
mImages.get(1), mImages.get(2));
break;
case 4:
mRule4.measureChildren(mActualWidth, mActualHeight, mSpacing, mImages.get(0),
mImages.get(1), mImages.get(2), mImages.get(3));
break;
}
mBottomRule.measureChildren(mActualWidth, mActualHeight, mSpacing, mBottomLayout);
mActualHeight = mActualWidth + mBottomLayout.getMeasuredHeight();
setMeasuredDimension(mActualWidth,
heightMode == MeasureSpec.EXACTLY ? heightSize : mActualHeight);
}
|
layout 步骤
1
2
3
4
5
6
7
8
9
10
11
12
13
14
15
16
17
18
19
20
21
22
23
24
25
26
27
28
| @Override protected void onLayout(boolean changed, int l, int t, int r, int b) {
if (mImages == null || mImages.isEmpty()) return;
switch (mImages.size()) {
case 1:
mRule1.layoutChildren(mActualWidth, mActualHeight, mSpacing, mImages.get(0));
break;
case 2:
mRule2.layoutChildren(mActualWidth, mActualHeight, mSpacing, mImages.get(0),
mImages.get(1));
break;
case 3:
mRule3.layoutChildren(mActualWidth, mActualHeight, mSpacing, mImages.get(0), mImages.get(1),
mImages.get(2));
break;
case 4:
mRule4.layoutChildren(mActualWidth, mActualHeight, mSpacing, mImages.get(0), mImages.get(1),
mImages.get(2), mImages.get(3));
break;
}
mBottomRule.layoutChildren(mActualWidth, mActualHeight, mSpacing, mBottomLayout);
}
|
看上去是不是很干净呢23333!
静态 View 的布局&测量
这里和上半部分不同,不需要根据业务动态排列子 View,所以使用一个 xxxx.xml 来布局,如图:
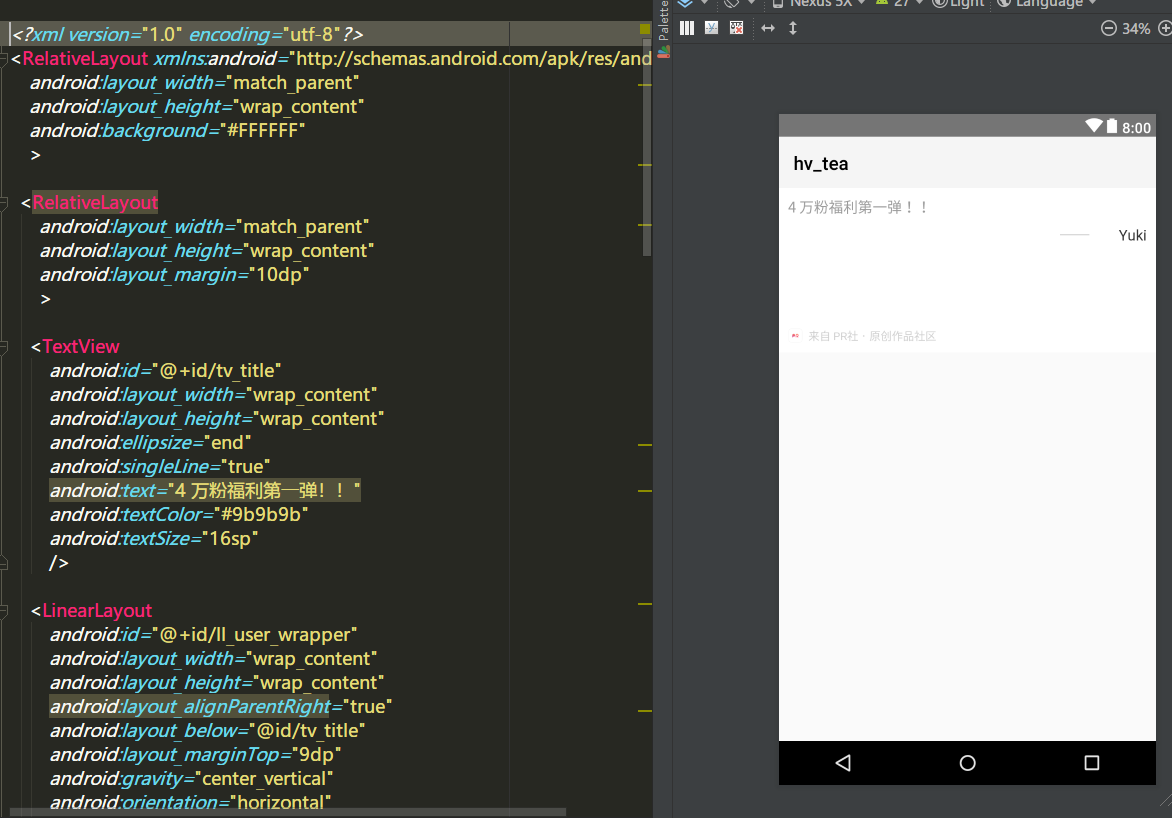
NOTE:这里的根布局,没有写 layout_height=match_parent,因为下半部分的高度实际上应由内部的子 View 高度来决定!这也就是说,我们进行下半部分测量的时候,我们需要自己计算下半部分的高度到底是多少,这样,才能得到 DynamicShareView 的高度数值!那么问题来了,如何测量 layout_heigh=wrap_content 的 View的高度呢?看代码:
1
2
3
4
5
6
7
8
9
10
11
12
13
14
15
16
17
18
19
20
21
22
23
24
25
26
27
28
29
30
31
32
| public class BottomRule extends AbsRule {
public BottomRule(Context context) {
super(context);
}
@Override
public void measureChildren(int screenWidth, int screenHeight, int spacing, View... children) {
measureManually2(children[0], screenWidth);
}
@Override
public void layoutChildren(int screenWidth, int screenHeight, int spacing, View... children) {
children[0].layout(0, screenWidth, screenWidth, screenHeight);
}
}
public abstract class AbsRule implements Rule {
private Context mContext;
public AbsRule(@NonNull Context context) {
mContext = context;
}
protected void measureManually2(View target, int widthSize) {
int widthMeasureSpec = View.MeasureSpec.makeMeasureSpec(widthSize, View.MeasureSpec.EXACTLY);
int heightMeasureSpec =
View.MeasureSpec.makeMeasureSpec((1 << 30) - 1, View.MeasureSpec.AT_MOST);
target.measure(widthMeasureSpec, heightMeasureSpec);
}
}
|
看到 measureManually2 这个方法,我想机智的童鞋已经豁然开朗了。至于为什么可以用这种方式测量出 layout_width=wrap_content 的 View 的高度,答案在 《Android开发艺术探索》一书中的 自定义View
一章。
implements Adapter 的坑
上面讲过只要实现 Adapter 这个接口就可以了,然而实际上,能否成功生成图片的关键也在这里,稍微不注意,就会陷入异步问题的深坑中。
如何加载图片呢
主流方案一般是用 Picasso、Glide 这样的图片加载库,这里,我使用的是 Glide。那直接 Glide.with().load().into ... 不就万事大吉了嘛!nonono,不是这样滴,因为 Glide 加载图片的过程是异步的,也就是说 ImageView 可能已经全部添加到 DynamicShareView 了,onMeasure、layout 的步骤也完成了,但图片还未从网络、磁盘加载完,ImageView 里的 Bitmap 是不存在的 。这时,我们再这么做:
1
2
3
4
5
6
7
8
9
10
11
12
13
14
15
16
17
18
19
20
21
| public void share(View target) {
measureManually(target, ScreenUtil.getScreenWidth(mContext),
ScreenUtil.getScreenWidth(mContext) + DensityUtil.dip2px(mContext, 175.0F));
target.layout(0, 0, target.getMeasuredWidth(), target.getMeasuredHeight());
Bitmap bitmap = generateBitmap(target, target.getMeasuredWidth(), target.getMeasuredHeight());
try {
saveBitmap(bitmap);
} catch (FileNotFoundException e) {
e.printStackTrace();
} catch (IOException e) {
e.printStackTrace();
}
mContext.startActivity(createShareIntent());
}
|
生成的 Bitmap 很可能是没有图片的。因为这些图片都是需要 Glide 去远程图片服务器加载,解析后才能得到的。而我们并不知道加载这些图片需要多久,甚至都没有等待这些加载工作完成,就直接填充数据到 DynamicShareView 上,然后满怀期待地生成 Bitmap 了…
解决方案
简单来说,就是在知道图片全部加载完成之后,我们再生成最后的分享图,关键就是等!
这里我使用了一个计数器,每当 Glide 加载完成,拿到 Bitmap 后,我就让计数器+1,当计数器等于需要加载的图片个数时,回调。如下:
1
2
3
4
5
6
7
8
9
10
11
12
13
14
| Glide.with(viewGroup.getContext())
.load(mImages.get(position).getImageUrl())
.asBitmap()
.into(new SimpleTarget<Bitmap>() {
@Override public void onResourceReady(Bitmap resource,
GlideAnimation<? super Bitmap> glideAnimation) {
ivCover.setImageBitmap(resource);
mloadImageCount++;
if (mloadImageCount == getCoverCount() + 1) {
mOnImageLoadedListener.onImageLoaded();
}
}
});
|
外部构造 Adapter 实例时,传入一个 OnImageLoadedListener 即可。
1
2
3
4
5
6
|
public MyAdapter(@NonNull Context context, List<Image> images, @NonNull Bottom bottom,
@NonNull OnImageLoadedListener onImageLoadedListener) {
}
|
优化&思考
- Bitmap 的生成其实是一个耗时的操作,能否搬移到工作线程中
- 有没有比计数器更好的实现来解决异步问题
- 该实现有没有 leak memory 的风险
- 如果下半部分的文字内容很长,是否会导致 OOM